Showing posts with label car construction. Show all posts

Thursday, July 19, 2018

Furniture and Carriage Cars

As just about everyone knows, the scope of a project has a way of growing. The one I just finished started after I completed the Henderson Carriage factory at Stockton (see my post here). I wanted a carriage car or two to service the factory. As you can see, the project did grow significantly.
     My first choice was the A. A. Cooper car shown above. I liked the billboard look of the car. It was also 40 feet long, a typical size for carriage and furniture cars of the period. This was due to the fact that the loads they carried were relatively light for the volume so they could build larger cars without increasing the stress on the timbers and trucks. Decals were by Art Griffin.
   
 My second car was to be a Southern Pacific furniture and buggy car, also a 40-footer, and one for which I had original drawings. It was the car which the SP used to represent the maximum height and width for travel over Donner Pass. It was large enough that the bolsters were lowered to keep the total height down. Notice how the body sort of nestled over the trucks similar to the apearance of some narrow gauge cars. I had the decal set for the Cooper car, some SP heralds left over from another project and the rest was not difficult to make up. While I was rummaging through my decal drawer, I found a few more decals and thought I might as well build up some of them, all of which were larger cars. This led to the following cars.
     The Abernathy Furniture Company was a Kansas City concern whose building still exists in the West Bottoms area of the city. According to some documents I have, these cars made it out to California in the 1890s so it was appropriate for use on the S&C. Decals for this car were also made by Art Griffin.
   
     The Santa Fe cars also appeared in California and, since several of my operators are Santa Fe fans, I decided to include it. It rode on Thielsen swing-motion trucks. More Griffin decals.
     
Kentucky Refining was a surprise to me when I found it in a record of cars appearing on the Southern Pacific. It was a 52-foot long behemoth (for the day) and delivered all sorts of oil, mostly for cooking purposes. The two hatches in the roof presumably were for loading tanks located inside the car. Another great decal set by Art Griffin.
   
The Samuel Cupples car was 50 feet long and another car which was extra high. Here was another manufacturer who used all the "billboard" space he could. I guess he thought bigger was better. More of Art Griffin's work.
   
The C. C. Comstock car was one which has intrigued me ever since I saw a photo in poor condition. Mr. Comstock was again one of those who liked advertising and apparently multi-colored paint jobs and fancy lettering. Applying the decals was somewhat exacting but they came out to my satisfaction which is what matters.
   
While going through this, I found another large car, the Menasha Woodenware 50-foot long car described as the tallest freight car built (of the period anyway). It was a kit made by Main Line Models and one I had forgotten I had. Since it fit with the theme of large car construction, I assembled it as well. Interestingly enough, one of these cars was restored or reconstructed and donated to the National Railroad Museum so you can visit it if you like. These cars, too, made it out to California.
     While a 50-foot car seems like no great shakes in the context of modern railroading, these "monsters" as they were sometimes called gave rise to editorials questioning the wisdom of such large cars on the railroads. To give an idea of what they were talking about, take a look at the photo below comparing a standard 34-foot car to the Menasha car. There was a lot of difference, especially in high winds. And, yes, there were even larger 60- and 70-foot wood cars tried out before the car builders wisely changed to steel construction.

Wednesday, July 18, 2018

Windmills and a Little Whimsy

The prototype Davis windmill wheel and vane on display at the San Joaquin County Historical Society at Micke Grove Park.
The Improved Davis Windmill.
Stockton, at least in my time period, was known as "The City of Windmills." Windmills were needed since Stockton was on a flat plain. With no elevated spots nearby, there could be no gravity flow of water, and before vast municipal water companies, the only way to get water was to pump for it. Hence
the mills were erected in almost every backyard, all grinding and squeaking away providing background noise for the city's business. Stockton may also have been known as the Windmill City because there were at least two manufacturers located in town: R. F. Wilson and Relief Windmill.
     The R. F. Wilson company had its plant down by the Stockton Channel not too far from where the rails of the Stockton & Copperopolis ran. While the prototype railroad did not directly service the plant, my S&C does so I had to have some of the Davis style windmills the company made. Fortunately for me, there are numerous pictures showing the popularity of the Davis mill and there is an real windmill wheel and vane assembly in the San Joaquin County Historical Society which I could measure and copy.
The Improved Davis Windmill as rendered in Sketchup.
   
     Building a windmill wheel is kind of tricky. All of the parts are small and must be aligned perfectly for it to look right. I decided to try to 3D print mine. It was my first project and went ahead without too many mistakes and starting-overs. I had it printed, made some decals and had a genuine [model] Davis windmill. Now I've got to print a few more to scatter around the landscape.
   
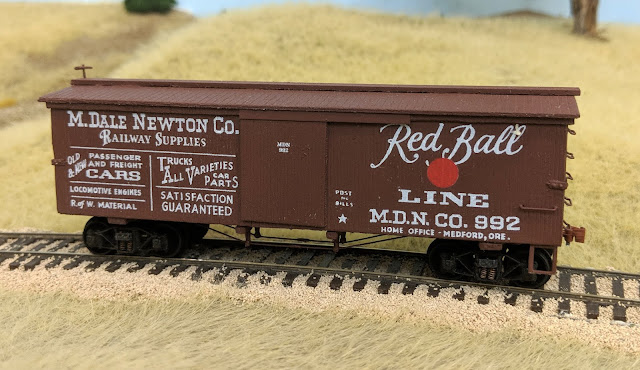
While building some other boxcars (more about these in a later post), I came across a couple of old items. One of these was a decal set I had made several years back for a Central Valley Superior Detritus car. Back in the 1950s, when Central Valley was building older railroad car kits, George Hook, CV's owner, made a few special kits up for his friends. One of these was for the imaginary Superior Detritus company advertising such things as diacoustic infusoria, frangible ceramics and so on. I have always liked the car so I built a standard CV boxcar and lettered it for the SD Company.

The original cardboard sides and the Central Valley car with the new decals applied.
     The other item was a set of cardboard sides for a Red Ball boxcar. Before high quality decals, screen-printed cardboard sides were very popular and really didn't look too bad. The Red Ball sides advertised the products the Red Ball company made in the style of the nineteenth century. Most of the Red Ball parts (no sides, though) are still being offered through Bitter Creek Models. I did not want to use the printed sides so I scanned them and made up artwork for a decal side which I used.
     These two cars represent the whimsy alluded to in this post's title. There were never any prototype cars such as these run on America's railroads but I enjoyed building them and remembering when I first saw the SDC car at age 12 and the Red Ball car a bit later. After all, as Model Railroader used to say (and sometimes still does), Model Railroading is Fun.

Wednesday, February 3, 2016

Carleton Watkins Visits the S&C

Watkins's photo car with wagon attached to a long caboose as was found in several photos of the Watkins "train."
Carleton Watkins made a trip over the Stockton & Copperopolis the other day. Who is Carleton Watkins you might ask? He was the Ansel Adams of the nineteenth century taking photographs all over the west from Oregon to the Comstock to Arizona and Southern California. How does this concern we modelers of ancient railroads? He had a special car, such as it was, to carry his photographic wagon about and it shows up in numerous photos of his. It's almost always in the background but it's unmistakable and always accompanied by an old coach or long caboose. I've always enjoyed viewing his photos so I finally decided to build his car and photo wagon.
   
The Watkins prototype car with wagon and long caboose which was used for living quarters. Photo taken at Dos Palmas, California in the 1880s.
The car was a standard 29-foot flatcar built by the California Pacific RR with a room added at one end. I built the car out of strip styrene with scribed styrene walls for the room portion. The windows in the room area only have bars on them so this may have been where Watkins stabled his horse when traveling on a train or it might have just been a storage area.
   
The Watkins photographic wagon on the pier at San Francisco. 
The photo wagon was just a Jordan Products standard wagon kit with decals based on the photo of the prototype wagon. I don't know if Watkins ever traveled on the prototype S&C but he could very well have done so en route to Yosemite when he took photos there. I'd like to think that he did.

Wednesday, August 26, 2015

Odds and Ends

The far siding is for the Stockton Agricultural plant while the middle one is for the future Standard Oil distribution center. A copper smelter will occupy the area adjacent to the ore cars. The cars themselves were built after similar cars used by the Virginia & Truckee Railroad for hauling ore.
When I am waiting for parts to arrive, I generally find some smaller projects to myself busy. That is what has happened over the past few weeks. Over in the Stockton area, there were three rail-served industries that had not had track laid to them, mainly because I hadn't decided just how the structures would be arranged.
   The first industry was the Stockton Agricultural and Manufacturing Company. The prototype made all sorts of things from plows to harvesters to steam traction engines. It was a large complex occupying several buildings. There was no way I could accommodate all of the buildings so I had to selectively compress what was there. Using an 1895 Sanborn insurance map, I decided which ones best represented the buildings and laid them out on the plywood sub-roadbed. This location pretty much defined where the Standard Oil Distribution facility would go. The only problem left was where to put the copper smelter.
    Stockton, in the 1890s, did not have a copper smelter. Any ore sent down from Copperopolis was shipped to smelters outside of California. The trouble (for me) was that I had a nice set of 4-wheel ore jimmies that I wanted to use. The only logical way to use them was to carry the ore to a smelter and the only logical place for that smelter was in Stockton. After evaluating every other option I could think of, I decided to install a diamond crossing in the siding tracks. Since the siding that would be crossed was on a curve, a special diamond needed to be built. I laid out the curve simply by taping a piece of paper over the track and making a rubbing of the rails on the paper. The location of the other track was marked in the same way. Using that as a guide, I soldered up the diamond on PC board ties. It was not as difficult as I had thought it might be. The resulting siding is just long enough to hold the string of empty ore cars as well as the full ones which will replace them.
   
The Canfield-McGlone kit is a good model of the prototype and is easy to assemble. Note the end doors.
Another of the small projects was assembling a kit of a car I had been wanting to build for several years. Photos of the Standard Wagon Co. car of the Cincinnati, Hamilton & Dayton Railroad have been around for years. Irv Schulz, Clover House, Art Griffin and even MDC had made cars or lettering sets for it. A couple of years ago, John Canfield and Bob McGlone developed a kit for the car which simplified my work immensely. 
   
The prototype car was built without air brakes and is pictured here around 1890.
The car is interesting in that it was built on an old flat car. The stake pockets are clearly visible along the bottom of the car. The car siding is horizontal which is consistent with it being attached to long vertical stakes. The Official Railway Equipment Registers specifically call out this car as being only for buggies (i.e. relatively light loads) and should not be loaded with heavy freight. The end doors make it interesting. They were typical for carriage and buggy cars. Maybe I will have to build some end platforms on my team tracks.
   Unfortunately, the car kits were a limited run and are no longer available. They should not be too hard to build, however, using the information from the ORER and the photo.

Thursday, August 6, 2015

Another Town Finished and a Long Caboose

An overview of Burnett's with the corral, general store and warehouses.
The scenicking around Burnett's is pretty much complete now. There are still some vehicles and figures which need to be added but I'm happy with how things turned out. The Gilmer & Martin Warehouse is for grain and is a big shipper for the railroad while the Golden State Box Company turns out crates for the area's fruit and produce packaging industry.
 
The Gilmer & Martin warehouse is to the left while the depot and storage room
are at the right.
The G&M building is scratchbuilt based on plans found in SP station plats plus some insurance diagrams (no photos found yet). The GS Box building is a Walthers shed to which I added a platform and did some weathering so it would like a little unkempt. The interesting part of the area is that it was not an agency station but it had both a depot building and a storage facility. These are modeled full size. In 1871, the depot building was a saloon but, by 1895, it was a depot so I modeled an enclosed waiting room. The other building was called a barn or just storage. Again, no photos of either so I put together a sort of baggage/storage building and painted it the railroad's color scheme.
 
Looking down the county road into the crossroads of Burnett's shows the general store plus the grain warehouse.
The stock pens were also there so I used a Walthers stockyard kit to make these. Some day, I'm going to have to build up some stock cars. Ziegenhorn's General Merchandise stores rounds out the crossroads area. I may yet add a local blacksmith shop but I need to do some other things first.
   
The S&C's Long Caboose could seat around 32 people plus the train crew so it could take a load off a regular passenger train.
While waiting for things to dry, I started a project I had been looking forward to: a Central Pacific Long Caboose. While some folks would call it a drovers' caboose, the CP just labeled it a "long caboose" so that is what the S&C will call it as well. It was obviously designed to carry a few passengers so I may have to convert one of my trains into a mixed. Drawings show the car as being 52 feet long over the end beams. My car was scratchbuilt using styrene with Grandt Line windows. The trucks were an odd size (6-ft. wheelbase) but I found just what I needed on the Shapeways site.
   What's next? Well, Burnett's was a flag stop but just exactly how did a prospective passenger flag a train? It turns out that several companies made small signals just for this purpose and that will be my next project.
 

Tuesday, October 28, 2014

Bridges and Boxcars

One of the finished trusses temporarily mounted on the piers. The finished bridge will be assembled on the layout.
The last few weeks have again been hectic with traveling to various events. The annual Virginia & Truckee RR Historical Society was held in Carson City Nevada at the first of October and was great as usual. It's the only place that I know where several early railroaders, both modelers and historians, gather. If you aren't a member, take a look at their website (www.vtrrhs.org). The society has a great quarterly magazine and publishes at least one book on the V&T each year.
 
Built in 1885, the wood structure lasted until the late 1890s. This view looks
 south into Oakdale
When I finally ended up at home, I decided to start construction on the Stanislaus River Bridge. This bridge was built in 1871 and allowed the S&C to enter Oakdale. It had two 140-foot wood Howe Truss bridges and several hundred feet of approach trestle. In amongst all the other things, I started on the two Howe trusses and managed to get them finished. It was not difficult work, just tedious. I started by making a jig so that the four sides needed would match and started cutting and gluing stripwood together. Making the metal tension rods took a little bit longer.
 
Each bay of the bridge had five tension rods at the joint. Mine were made from .015 inch music wire. Grandt Line NBW
castings cored .020 inches were used for the nuts at either end of the tension rod.
When the truss bridges were done, I started on the wood piers but then ran out of wood. I ordered a huge supply and, while waiting for it, started work on some Silver Crash Car Works boxcars. These are 28-foot cars and follow a Southern Pacific prototype, just perfect for the S&C. I purchased 20 of these a few years back and am just now getting to them. These managed to get finished except for paint. I'm waiting for the trucks to come in so I can paint everything together. This was not a great setback since the wood arrived in the interim. This allowed me to finish the two piers (the third pier is trestlework).
Ten boxcars await paint. The prototype of these cars was built to handle trade for the California Fast Freight Line, a traffic
expediter arrangement between the Central Pacific, SP, Union Pacific, C&NW and Rock Island.
   The jig for the trestles has been made so I will probably start putting the bents together next. More later after the paint arrives and/or the bents get built.

Friday, January 3, 2014

New Boxcars for the Stockton & Ione

New boxcars for the Stockton & Ione are patterned after 1880s Denver & Rio Grande prototypes. The red barrels are on a building behind the cars.
The HOn3 Rail Line boxcar kit has been around for a while and it is a good representation of a 30-foot later period D&RGW car. I wanted to try to see if I could easily modify it to represent an early 25-foot car of 10-ton capacity. To do this, I cut the car at the door opening and glued the two halves together with some reinforcing strips inside. This gave me the necessary length. Using a fine razor saw, I removed the roof running boards. Some .020 thick styrene with .060 scribing applied right over the Murphy roof gave me the earlier wood plank roof. A .010 x .080 strip was applied for a new fascia and cut flush with the car ends. New doors were made from .020 scribed styrene and the door hardware from the kit used to "hang" it.
 
The lettering was varied slightly with the arth to a give a little variety to the cars.
 The earlier boxcars had short end platforms for the carmen to stand upon. I glued .060 x .124 strips with scribed siding to represent those. The nut-bolt-washer representations for the grab iron bolts were removed with a razor blade except for two on the end for the new grab irons. The floor was similarly shortened and reglued. Fishing line truss rods and Grandt turnbuckles were used. The brake cylinder was only applied to one car as I figured this little narrow gauge line would be slow in putting brakes on everything.
   
Compared to the 1875 S&I prototype cars, the D&RG freelanced cars are much more graceful.
   The cars were painted boxcar red and decals based on D&RG lettering schemes were applied. The finished car is not an exact model of the prototype but close enough for the Stockton & Ione.