Monday, December 17, 2018

The Danger of Estate Sales

Pine from Home Depot and drawer pulls from Amazon combined to create a workaday cabinet.
A couple of years ago, my wife and I were at a local estate sale. The owner of the articles in the sale was obviously a woodworker based on the tools available. In a corner, I found a box of partially built small drawers and pre-cut parts for several more. For $10, I took the box home figuring I could do something with it.
     While it was marinating on the shelf, my collection of Precision Scale and Cal Scale parts kept growing until they overflowed the available space. I had finally found a use for the drawers. Assembling the existing drawers was easy as was cutting a few new parts to make a total of 30 of the little things. Last week, I finally bought some more lumber to build a case for them which I finished today. Some label-holding drawer pulls finished things off. The final project is not what I consider a great example of the woodworker's art but it will hold my parts. Mission accomplished but through more work than I expected when I visited that estate sale. Now back to model railroading stuff.

Saturday, December 1, 2018

Another Turntable

With the finished turntable mounted in its pit, filler material still needs to be added in the area between the benchwork and the turntable casting. The prototype turntable was built of cast iron with its distinctive lightening holes.
Like most modelers, I have more locomotives than I really need. My choice, then, is to remove some of them from the railroad so I can operate it without stumbling over the extra motive power OR build some place to put them. My choice is to build a roundhouse in which to store all the engines I don't need but want to have anyway.
     At Oakdale, there is a space which is out of the way but is the perfect size for a small engine terminal. This area has been earmarked for such a terminal since I started building the railroad. It will allow me to have my "overflow" area and, also, to build a Model Masterpieces Colorado Midland roundhouse kit I have had for around 20 years. The first step in all of this was to locate the turntable and go from there.
     My Sellers turntable was built from a Freshwater Models kit which was out in limited edition several years ago. I had provided prototype information to the kit company and they did such a nice job on it, I had to have one. Made with a plaster pit and cast metal base, it went together rather quickly. Installing in the hole I had made was a bit more problematic. It required two people, one on top of the railroad and another beneath the benchwork to put nuts on the support bolts. My darling wife agreed to help and, as a true gentleman would, I offered her the choice of positions. Climbing underneath a built railroad and trying to start nuts with my left hand (I'm right-handed) is a bit of a challenge but, eventually, we secured the turntable and leveled it up. 
   
Lines for tracks in the roundhouse extend from the pit. The turntable is based on a 60-foot prototype which is ample for the locomotives used on the S&C.
The next job will be to assemble the eight-stall roundhouse and try to get it reasonably aligned with where I want the tracks to go. A real engine servicing area requires a coaling station, sand station, water plug and ash track as a minimum so I have to allow room for those and then assemble the appropriate structures. With the company service tracks and a new industry track I discovered, there will be four more car spots in Oakdale which should add more interest.


Sunday, November 11, 2018

Fan Away Your Troubles

The benchtop fan takes little space on the workbench and pull vapors through it rather than letting them settle elsewhere in the room.
My modeling bench has a terrific setup. It is located in the corner of my wife's quilting room. It's upstairs so I don't have to go to the basement and work alone and I can visit with my wife when we are working in the same room. There is a downside, however. Some of the processes we use to build our miniature world emit odors. They are generally the pleasant ones associated with soldering, painting and using super glue. Unfortunately, these are also odors which can lodge themselves in fabric and in the sensitive nostrils and lungs of non-modelers. To help mitigate the situation, I recently purchased a benchtop fan specifically designed for benchtop-oriented vapors.
   
The fan in its high-performance position.
It seems that there are a lot of processes (soldering seems the most prevalent) which could use the fan. The one I purchased was a Hako FA-400, available at Amazon. It comes with a carbon filter which should eliminate the troubles. It has a high rating among these fans and has two possible orientations, one for general air circulation and one for a more high-power application.
      Hopefully, this little unit will resolve my particular problem and, perhaps, yours as well.

Friday, November 2, 2018

Protective Shields for Delicate Structures

The polycarbonate plastic protects the bridge from destruction-by-owner.
In a recent post, I told of the recent completion of a road bridge (http://sandcrr.blogspot.com/2018/10/new-county-bridge-erected-over-little.html). While the delicate appearance of its members is pleasing, it also makes the bridge very delicate. I would be the first one to admit that I am somewhat clumsy. I could see myself leaning over the bridge or catching it with my long-sleeved shirt, all of with the same result - disaster.
     To help prevent the new bridge from being "washed out" by operators or, more likely, myself, I cut and mounted a piece of 3/32" thick polycarbonate plastic. Home Depot and other similar stores carry it in stock. Other delicate items such as signals can be similarly protected.
    This should deter all but the most determined bridge wrecker, at least I hope so.

Central Pacific 564 - A Review

The finished Central Pacific boxcar with Bitter Creek Allen trucks. 
When the Central Pacific was in its infancy, it purchased 25-foot boxcars with a capacity of 15 tons. The traffic on the railroad quickly telegraphed its need for higher capacity cars and, in the 1870s, 28-foot cars became the standard with 34-footers later on in the century. The little 25-footers lasted for quite a while (a few hundred were on the 1895 roster) with some lasting into the 20th century.
     My model was built from a Bitter Creek Models (www.bittercreekmodels.com) kit. Laser-cut underframe, ends, side and roof comprise the kit with plastic injection-molded parts for brakes, bolt castings, etc. A basswood frame and ends form the basis of the car with basswood strips comprising the roof sub-frame. Thinner, laser-cut sides, end pieces and roof are glued onto the frame pieces. Enough pieces are supplied so that either cars from the 1870s and the later 1880s rebuilt cars can be built. The roof comes in a style representing the original metal-clad roofs and also the later wood roofs. Supports for the running board slide into slots in the roof which simplifies this tedious task.
     The instructions are very clear with several illustrations so that is little doubt as to what needs to be done at each step. Lettering diagrams are provided so that the kit's decals can be applied accurately. There is enough decal material so that a car from the 1870, 1880 rebuild or the 1891 renumbering can be built.
     
I built my car to reflect one which had lasted from 1870 and had not been rebuilt but had been relettered during the 1880s. An interesting note is that these cars were lettered with even numbers only. Flat cars were odd numbers only. The reason for this escapes me but it was common at the time. Perhaps it was for a quick identification of a car type when referring only to paperwork.
     Trucks and couplers are not included in the kits. Bitter Creek makes some very nice Allen/California swing motion trucks (P/N T-29) which are suitable for this car. Also available are CP/V&T Kimball trucks (T-30) and Light Thielson 15-ton trucks (T-32), any of which would be suitable. Bitter Creek also has several other nineteenth century trucks, many of which have been remastered and look very nice. Kadee 711 couplers were used.
      The boxcar kit is Bitter Creek's P/N K-20 and retails at $25.00. I recommend it highly as a well-researched, well-designed kit suitable for any nineteenth century railroads.

Saturday, October 27, 2018

New County Bridge Erected Over Little John Creek

Stockton Daily Independent - July 2, 1895


The new steel bridge now spans the normally-dry Little John Creek. The abutments are what was left after cutting the Chooch ones used on the railroad bridge in the background.
Yesterday, the new bridge over Little John Creek was dedicated and opened to traffic. Residents of the area are overjoyed at the prospect of regaining their connection to Farmington after the collapse the wooden bridge 16 months ago. Winning contractors for the project were the Cotton Brothers of Oakland, a well-known construction firm.
   
 
Farmers can now get their produce to the packers in Farmington. You can barely make out the builder's plate on the arch at the center of  the bridge. The device at the far right is a scissors phone used by crews during operation to OS their trains.
 In other words, I finally finished my bridge project and got it mounted on the railroad. As mentioned in my  previous post here, the bridge has been a 30-year project (sort of) and I am pleased that it is finished. It is very delicate due to its almost-scale sized components and I will probably erect a clear plastic barrier so I don't get my shirt cuffs entangled in the bridge and a cause of collapse.
   
A farmer on his way to Farmington crosses the new bridge. Although it is satisfactory for normal wagon traffic, one wonders how it will fare if the new "horseless carriages" catch on.
 My method of lacing the girders using laser-cut pieces worked out well. Although you can't see it very well in photos, I placed a builder's plate on the arch over each end of the bridge. It is a photograph of the original Cotton Brothers plate found on the prototype. Most people will probably not notice it but I know it is there.

Tuesday, October 23, 2018

Railroad Traveling - Nevada to Georgia

Ex-Central Pacific car lettered for a motion picture now resides at the Nevada State Railroad Museum.
The last few weeks have been another hectic time of the year. The Virginia and Truckee Railroad Historical Society had its Annual Conference in Carson City during the first part of October. This is an event I have attended for about 25 years and it is one of the year's highlights for me. Presentations on the V&T's operations and history and made along with a modeling workshop and, usually, a field trip. The nice thing is that these presentations are often presented by professional railroad historians presenting researched facts about nineteenth century railroading in general. The modeling programs featured items on locomotive performance and using 3D modeling techniques.
     The field trip consisted of a closeup inspection of the V&T coach 17. This was the Directors' Car which conveyed Central Pacific dignitaries to the driving of the golden spike at promontory. Over the years, it saw changes as it went to a coach, then to the V&T and then a career in the movies and, finally, as a museum piece. The V&TRRHS has published a book about the history of this car which can be obtained from the Society website (www.vtrrhs.org).
   
The diesel, having outlived its usefulness, is preserved in the local part.
Arriving home from the Conference, I had barely enough time to unpack and do my laundry before getting on another plane to Atlanta to participate in Dixie Rails. This is a model railroad event put on by the modeling community of the area. It consists of operating on four model railroads over a three-day period. It was great fun on great railroads with my favorite being Norm Stenzel's Brandywine and Benedictine Railroad. It represents a 1953 coal-hauling line in the Allegheny Mountains. There are many large steam locomotives plus some first-generation diesels plus great scenery. Norm has a good sense of humor with several small scenes around the railroad. My favorite was the late-model diesel in the park.
      If you are interested in early western mining railroading, consider joining the V&TRR Historical Society (www.vtrrhs.org). There is a quarterly magazine and a great conference.

Sunday, October 7, 2018

New Bridge for Little John Creek Under Construction

Deer Creek bridge in California shows its age. It was built in 1898 by the Cotton Brothers of Oakland, CA for the wagon trade. My first sight of the bridge came in 1972 when I crossed it in the back of a Model T Ford.
 The last couple of months have been rather enjoyable, hectic and disappointing, all at the same time. First, as most of you know, the NMRA National Convention was in Kansas City during the first part of August. It was enjoyable for me to see a number of old friends and to meet some new ones as well. I gave a clinic on tuning steam locomotive mechanisms and modeling the nineteenth century using modern methods. Both were well-attended and received.
     The hectic part running back and forth from home to the convention hotel because each clinic presentation was on a different day. One day, I had two busloads of conventioneers go through the layout followed by a number of Layout Design Sig folks on a special tour. On top of that, I hosted two operating sessions for the Operations Sig group. There were also dinners and then the National Train Show on the Weekend. All of great fun but I was glad to get back to a more restless pace of life.
     Disappointment reared  its head when I tried to get a couple of projects done. The first is an interlocking which will control the Central Pacific/S&C diamond at Stockton. I was on a roll, got the circuitry wired and came up one semaphore base short. That project went on hold pending arrival of a new part.
   
The girders were made from styrene channel held together with laser-cut lacing. Tension rods along the bottom of the bridge are more laser-cut pieces reinforced by brass strips. A wood deck roadway will cover the stringers after painting.
 Enjoyment, however returned when I started building a steel wagon bridge based on a prototype bridge I had measured about 30 years ago. It still stands outside of Grass Valley, California but the road no longer goes over it having been rerouted. I have been putting off modeling it because it is of very light construction and I wasn't quite sure how to model the laced girders to scale. This problem was finally solved with the arrival of my laser cutter which allowed me to cut the lacing I needed.
   
The intricate lacing which makes up the arch is all laser-cut. The reinforcements around the edges are of styrene. 
As the photos show, it's mostly styrene with some brass strips and rod. It's turning out so delicate that I think I should put a clear plastic box around it to protect it from injury. It's ready for paint in the next couple of days and then I'm off to the annual Virginia and Truckee Railroad Historical Society meeting in Carson City, Nevada. It's always a fun few days. The weekend after that will find me in Atlanta for an  operating weekend called Dixie Rails. I've never been and am looking forward to it.

Friday, August 24, 2018

Steamrollers on the Move

At the team track, waiting to be unloaded.
This little car started when I was reading a Facebook post by Bernd Shroter from Germany. He was just finishing a flat car with the steamroller as a possible load. The roller was originally an SS Ltd. kit, now available from Wiseman. Bernd had made some nameplates which are not in the kit but clearly present on the prototype rollers. He had some extras and was selling them so I bought two.
     I had one of the kits kicking around so I decided to build it up while waiting for some other parts.  Several hours later, I had finished the little guy. One to a car looked a little lonely so I ordered another one and built that one then chained both down on an available flat car.
     The flat car was one of several I had made in pairs, that is, two cars with the same number. In this case, I have one car with the load and the other with scraps of bracing and other dunnage. This way, I can actually swap cars out after an operating session leaving an empty car to take away from the industry during the next session.

Tuesday, August 14, 2018

New Car Arrives on the S&C

C&A 13103 rests on a siding in Oakdale before going into regular service.
During my first operating session at the NMRA convention, I had to the opportunity to host Howard Garner as one of the operators. Many on the Early Rail list know him and his Cascade Western Railroad (and Cascade Western Laser). Howard is an excellent modeler and a very fine gentleman. A totally unexpected but very delightful part of his visit was the gift of a car he had scratchbuilt, the Chicago and Alton No. 13103. It was a car he used to get an Achievement Award toward his Master Model Railroader. The car is very fine with a complete underbody detail. Thank  you so very much, Howard. It is already in service on the railroad.

NMRA National Convention 2018

Two guest operators switch at Peters during one of the week's operating sessions.
Last week, the National Model Railroad Association held its annual convention in Kansas City and was attended by almost 1500 model railroaders. During the week, these brave folks were treated to clinics, layout tours, operating sessions, non-railroad tours and some just plain fun.
   
The Copperopolis passenger local briefly stops at Milton en route to Peters.
 Since the Kansas City area is home to the Stockton & Copperopolis, we had to participate in the excitement as well. We had two bus tours with about 140 people viewing the railroad. I gave two clinics twice each. One was on improving the performance of small steam engines and the other was on modeling the nineteenth century using the modern techniques we have available. Both were well attended.
   
A private car is dropped off on the house track at Farmington by No. 4. 
 The railroad was also open for two operating sessions during the week and for a special visit by members of the Layout Design Special Interest Group. Capping off the week was the National Train Show where one could visit and speak with many of the hobby's manufacturers. It was a hectic time for me but well worth it. Now it's time to get back to normal and continue building things.

Thursday, July 19, 2018

Furniture and Carriage Cars

As just about everyone knows, the scope of a project has a way of growing. The one I just finished started after I completed the Henderson Carriage factory at Stockton (see my post here). I wanted a carriage car or two to service the factory. As you can see, the project did grow significantly.
     My first choice was the A. A. Cooper car shown above. I liked the billboard look of the car. It was also 40 feet long, a typical size for carriage and furniture cars of the period. This was due to the fact that the loads they carried were relatively light for the volume so they could build larger cars without increasing the stress on the timbers and trucks. Decals were by Art Griffin.
   
 My second car was to be a Southern Pacific furniture and buggy car, also a 40-footer, and one for which I had original drawings. It was the car which the SP used to represent the maximum height and width for travel over Donner Pass. It was large enough that the bolsters were lowered to keep the total height down. Notice how the body sort of nestled over the trucks similar to the apearance of some narrow gauge cars. I had the decal set for the Cooper car, some SP heralds left over from another project and the rest was not difficult to make up. While I was rummaging through my decal drawer, I found a few more decals and thought I might as well build up some of them, all of which were larger cars. This led to the following cars.
     The Abernathy Furniture Company was a Kansas City concern whose building still exists in the West Bottoms area of the city. According to some documents I have, these cars made it out to California in the 1890s so it was appropriate for use on the S&C. Decals for this car were also made by Art Griffin.
   
     The Santa Fe cars also appeared in California and, since several of my operators are Santa Fe fans, I decided to include it. It rode on Thielsen swing-motion trucks. More Griffin decals.
     
Kentucky Refining was a surprise to me when I found it in a record of cars appearing on the Southern Pacific. It was a 52-foot long behemoth (for the day) and delivered all sorts of oil, mostly for cooking purposes. The two hatches in the roof presumably were for loading tanks located inside the car. Another great decal set by Art Griffin.
   
The Samuel Cupples car was 50 feet long and another car which was extra high. Here was another manufacturer who used all the "billboard" space he could. I guess he thought bigger was better. More of Art Griffin's work.
   
The C. C. Comstock car was one which has intrigued me ever since I saw a photo in poor condition. Mr. Comstock was again one of those who liked advertising and apparently multi-colored paint jobs and fancy lettering. Applying the decals was somewhat exacting but they came out to my satisfaction which is what matters.
   
While going through this, I found another large car, the Menasha Woodenware 50-foot long car described as the tallest freight car built (of the period anyway). It was a kit made by Main Line Models and one I had forgotten I had. Since it fit with the theme of large car construction, I assembled it as well. Interestingly enough, one of these cars was restored or reconstructed and donated to the National Railroad Museum so you can visit it if you like. These cars, too, made it out to California.
     While a 50-foot car seems like no great shakes in the context of modern railroading, these "monsters" as they were sometimes called gave rise to editorials questioning the wisdom of such large cars on the railroads. To give an idea of what they were talking about, take a look at the photo below comparing a standard 34-foot car to the Menasha car. There was a lot of difference, especially in high winds. And, yes, there were even larger 60- and 70-foot wood cars tried out before the car builders wisely changed to steel construction.

Wednesday, July 18, 2018

Windmills and a Little Whimsy

The prototype Davis windmill wheel and vane on display at the San Joaquin County Historical Society at Micke Grove Park.
The Improved Davis Windmill.
Stockton, at least in my time period, was known as "The City of Windmills." Windmills were needed since Stockton was on a flat plain. With no elevated spots nearby, there could be no gravity flow of water, and before vast municipal water companies, the only way to get water was to pump for it. Hence
the mills were erected in almost every backyard, all grinding and squeaking away providing background noise for the city's business. Stockton may also have been known as the Windmill City because there were at least two manufacturers located in town: R. F. Wilson and Relief Windmill.
     The R. F. Wilson company had its plant down by the Stockton Channel not too far from where the rails of the Stockton & Copperopolis ran. While the prototype railroad did not directly service the plant, my S&C does so I had to have some of the Davis style windmills the company made. Fortunately for me, there are numerous pictures showing the popularity of the Davis mill and there is an real windmill wheel and vane assembly in the San Joaquin County Historical Society which I could measure and copy.
The Improved Davis Windmill as rendered in Sketchup.
   
     Building a windmill wheel is kind of tricky. All of the parts are small and must be aligned perfectly for it to look right. I decided to try to 3D print mine. It was my first project and went ahead without too many mistakes and starting-overs. I had it printed, made some decals and had a genuine [model] Davis windmill. Now I've got to print a few more to scatter around the landscape.
   
While building some other boxcars (more about these in a later post), I came across a couple of old items. One of these was a decal set I had made several years back for a Central Valley Superior Detritus car. Back in the 1950s, when Central Valley was building older railroad car kits, George Hook, CV's owner, made a few special kits up for his friends. One of these was for the imaginary Superior Detritus company advertising such things as diacoustic infusoria, frangible ceramics and so on. I have always liked the car so I built a standard CV boxcar and lettered it for the SD Company.
The original cardboard sides and the Central Valley car with the new decals applied.
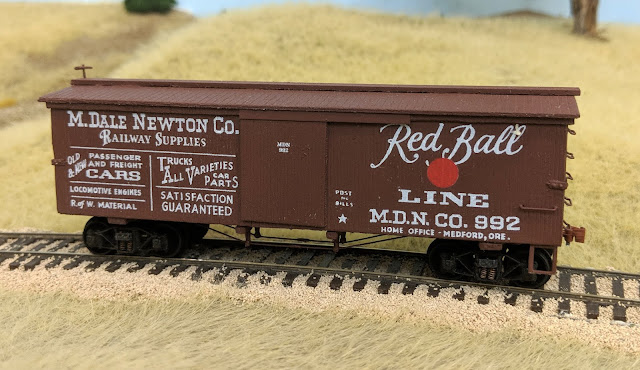
     The other item was a set of cardboard sides for a Red Ball boxcar. Before high quality decals, screen-printed cardboard sides were very popular and really didn't look too bad. The Red Ball sides advertised the products the Red Ball company made in the style of the nineteenth century. Most of the Red Ball parts (no sides, though) are still being offered through Bitter Creek Models. I did not want to use the printed sides so I scanned them and made up artwork for a decal side which I used.
     These two cars represent the whimsy alluded to in this post's title. There were never any prototype cars such as these run on America's railroads but I enjoyed building them and remembering when I first saw the SDC car at age 12 and the Red Ball car a bit later. After all, as Model Railroader used to say (and sometimes still does), Model Railroading is Fun.

Wednesday, June 27, 2018

New Combine Added to Roster

Stockton & Copperopolis combine Number 16 photographed just outside Copperopolis.
Due to rising lease costs, the S&C management decided to purchase its own combine for trains running on the Milton branch. It is very similar to those used successfully on the Virginia & Truckee Railroad and is expected to give good service here.
     In reality, for several years now I have not had S&C lettered coaches for the Milton branch and have been using some of my old Moraga Springs Northern equipment. A note that a member of the EarlyRail io-group list wanted to sell an old Central Lines kit prompted the replacement. The Central Lines kits were made in the 1950s, perhaps into the '60s and were crude compared to today's standards. For example, the roof was a milled piece of wood which you were expected to shape into something resembling a clerestory roof. I had noticed a 3D printed roof offered by Eight-Wheeler Models and thought it might be a good substitute.
   
The 1950s Central Lines box with the "high-tech" (for then) roof. The 3D
printed roof looks a lot better.
The point of the kit is that it had very good sides apparently molded in plastic with decent detail. The roof was designed to fit on Model Die Casting Overland passenger cars but I figured that it could be shortened. The trucks were another item listed on Shapeways which I had used on my Long Caboose project a while back.
     I started putting the kit together per the instructions. The platform steps were all right but the end railings leaved something to be desired so I substituted Cal-Scale railings. Truss rods are of .015 inch fishing line. Before I ordered the roof, I checked the width of the MDC cars and they were the same as the Central Lines Kit. Shortening the roof consisted of cutting a piece out of its center and gluing it back with some reinforcement on the underside. Some Testors patching putty was used to smooth out the joints. It did not come with the clerestory windows so I cut those out of some stiff cardboard and glued them in.Since the original kit roof was straight with straight letterboard extensions, I glued a piece of styrene to the sides and shaped the ends to fit the new roof. Roof detail is from Grandt Line parts.
     The lettering was based on the prototype V&T 16 in the California State Railroad Museum. I tried something a bit different for the roof finish this time. In the nineteenth century, the roofing on most passenger cars consisted of sheets of terne metal crimped together. To simulate this, I applied a decal which had lines simulating the standing seams of the prototype. The artwork was borrowed from my friend, John Ott, who developed it for one of his cars. I think it looks pretty nice. Thanks, John.

Friday, June 8, 2018

The Depot at Farmington

Although the steps seem to be floating in air, when scenicking is done, they will be flush with the top of the ties. An earth berm will run from the train order signal past the privy .
The Farmington Depot is now complete except for scenicking. It was an interesting project using customary model building techniques combined with laser cutting and 3D printing.
The 3D printed casings fit perfectly around the Tichy
window castings.
The depot has some unusual casing details around the upper part of the window. I drew up some 3D drawings of it sized to fit the Tichy windows and doors I was using and sent them to Shapeways to have the casings printed.
     In the prototype photo shown in my last blog (http://sandcrr.blogspot.com/2018/05/laser-cutting-and-depots.html), you can just barely see the end of a ladder peeking out from behind the depot. This was normally used to access the roof and it seems that most of the Southern Pacific depots had one. I relocated mine to the end of the building so someone might actually see it. The small "bridge" on the platform's end was used to span the gap between the platform and a car to aid in loading or unloading of it.
     Adjacent to the depot is something one sees at almost all of the depot photos, the privy. This one is a standard SP design and is made from two of the Tichy outhouse kits. The lattice work around the privy is also from Tichy.
The privy at Farmington and the model privy. It is a close copy. I realize that the model roof has a steeper pitch and the lattice work is square rather than on an angle. These were modeling considerations I took into account to get the "feel" of the structure rather than make an exact copy. In other words, I was a trifle lazy.

Tuesday, May 22, 2018

Laser Cutting and Depots

Farmington depot circa the 1890s. Note the privy behind the lattice fence at the right and the switch stand.
A few months ago, I bit the bullet and bought a laser cutting machine. It sat in my basement for 2-3 months simply because it was too cold in my shop to work comfortably. I finally started working with it a couple of weeks ago and just cut my first real project, the Farmington depot. The prototype was a board-and-batten structure and was relatively small as depots go. Being smaller in scale made it a good first project.
   
Farmington depot. The window and door openings were sized to accept Grandt Line windows and doors. In the foreground is .010" thick styrene with the gable trim cut out by the laser.
Depot with scallop trim.
Evergreen styrene was used for the basic siding. I always thought that styrene was really not suitable for laser cutting but that is not true. I managed to cut the siding very smoothly, especially the cutouts for the windows and doors. The ends of the depot had some interesting scallop trim that was perfect for the laser. I made a CAD drawing of the trim and the laser made a good job of it.
     The baggage doors were not the right size for either the Tichy or Grandt Line doors so I did another drawing. The doors using were cut from 3/32" acrylic and the trim from a manila file folder.
   
Acrylic baggage doors with trim pieces awaiting paint.
The building is not yet finished but is on its way and the laser has justified its expense (at least in my mind). One of the selling points on getting the machine was being able to cut special templates for my wife's quilting projects. Naturally, the very first project done was some holders on which to wind quilt binding.

Thursday, May 3, 2018

Factories at Stockton and Warehouse at Cometa

Henderson Carriages is located just behind the depot on the industry spur in Stockton.
Several years ago, I bought an old Magnuson kit called Menasha Woodenware. It had this great look of a three-story nineteenth century factory or warehouse. I had been looking for a place to put this building on the railroad and finally found it. It is in Stockton on the spur serving the Pacific Tannery, Simpson & Gray Lumber and the Globe Iron Works.
     Putting the kit together was fairly easy in spite of the fact that the instructions were missing. The sides were all cast resin and it was pretty intuitive. I had to decrease the depth of the building to fit the space I had but it still is an imposing structure.
     I decided to name it after the M. P. Henderson Carriage Factory. Henderson made wagons and carriages for use throughout the western U.S. Their Stockton factory was, indeed, a three-story building and looked somewhat like the Magnuson kit. Using a photo of the prototype, I made a few signs and now I have another switching destination for Stockton.
   
Cometa is looking better with two real industrial spots now. As soon as some more dirt is sifted, I can finished the scenicking.
 Recently, I was doing a bit of scenery around Farmington and decided that Cometa needed a couple of structures to establish it as a town on the railroad. The real Cometa had a grain warehouse and a corral and there was just enough space to model both of those. The Walthers Shed on Pilings kit is a nice small warehouse with sliding doors but it was too small for Cometa's needs so I bought two of them. Putting them together end-to-end gave a building about the right size but it was frame and looked like, well, two Walthers kits spliced together. Looking again at my map collection revealed that the prototype warehouse was sheathed in corrugated iron so I decided to do that. Using double-sized tape, I attached Campbell's corrugated iron to the building, painting it and then weathered it slightly with some Bragdon's rust powder.
     I wasn't sure what to call the warehouse, though. The information I had was a bit sketchy. I did some checking on the internet and found that an outfit called Haslacher & Kahn owned the Cometa concern plus several other grain warehouse in the area. Some more searching found an old letterhead for the company and gave me the style to be used on the sign. I printed it out and attached it to the building's side.
     The corral was built with pieces left over from a Walthers stock yard kit used elsewhere on the railroad. I added a small general store and some signs and now Cometa looks like a real destination point except for the lack of ground cover. I ran out of sifted dirt and so Cometa will look very barren until I sift some more.

Tuesday, April 17, 2018

The Rest of the City

Stand-in buildings show what a finished street might look like in downtown Stockton.
Making the building flats for Stockton (April 8 Post) started the city on its way to looking like a city. The unfortunate thing was that several of the streets ended at the backdrop and the result was not particularly realistic. I have seen other modelers use real photographs glued to the backdrop to make it look like the road continued but the only photographs I have of 1890s Stockton are in black-and-white. Since Stockton's nineteenth century buildings are mostly gone, I decided to try colorizing some of the monochromatic photos I have.
    Knowing nothing about colorization, I googled the process and found it to be rather straight-forward but a little tedious. Using Adobe Photoshop, I started adding colors and, a few hours later, had a reasonable-looking color street scene. After printing out a picture which appeared to be about the right size, I pasted it to the backdrop and the result is above.
     I needed at least one other photo but the bulk of my street scenes did not have the photographer standing in the middle of the street producing the right view for railroad modelers a century later. I did, however, have scenes of two separate streets which I thought could be combined, again using Photoshop. Once the two scenes were joined, I colorized the picture and the result is below.
   
This street scene was made by combining shots from two separate streets and joining them in Photoshop.
 I was pleased with these first attempts and am looking forward to completing the street, adding structures and a few vehicles. I think Stockton will start looking more like a big city.

Sunday, April 8, 2018

Industrial District Buildings Appear at Stockton

The entire set of flats I constructed stretches about six feet along the backdrop at Stockton. The depressed area at the right will be a marsh. The two gaps in the flats are for Centre Street (at left) and Commerce Street.
A few of my regular operators have told me that they would like to see some progress on structures at Stockton (it only had the two-stall roundhouse and an open-air warehouse for the steamer line). I decided to respond to their wishes and also get some kits out of their boxes. Using some of the Walthers building flats and a couple of parts from another kit, I came up with several distinct businesses, all of which existed in Stockton near the railroad.
 
The far right of the flats is the Pacific Tannery, one of the online shippers on the railroad. The two buildings to the left are Sylvester and Moye, furniture makers and Stockton Bags and Burlap.

The next buildings are Hammond, Moore and Yardley, grocery and provision sales and Thomas and Buell of the Stockton Planing Mill.
Wm. P. Miller sits between Centre and Commerce Streets. They were a big manufacturer of wagons and carriages. They weren't quite as well-known as Henderson but I liked the lettering on their building better.
To the left of Centre Street is the Stockton Glass Factory.
Having nineteenth century photos of the prototype buildings, I tried to use the same type fonts that were used then with the same slogans and signs. Unfortunately, the building flats themselves don't correspond to the actual buildings but are merely there to provide a sort of ambiance to the scene. I plan to work from the backdrop to the aisle as far the structures go
     Now I have to figure out what to do about the "continuation" of the streets into the backdrop. I have a couple of ideas which I hope to share once I perfect them.