Showing posts with label Stockton. Show all posts

Monday, June 8, 2020

A Photographer for Stockton

The Batchelder building in downtown Stockton.
Benjamin Pierce Batchelder started his photography business in Stockton in 1853. Although he moved his business around the world, he finally settled in Stockton for good in 1872, His business address was less than a block from the main line of the Stockton & Copperopolis. Batchelder died in 1891 but his wife, Nancy, continued to operate the business until at least 1895.
 
The decals were copied from a Kansas City photographer of the 1890s. The building front was painted
to resemble different types of stone used in its construction.
 My model of the Batchelder enterprise is freelanced. The Batchelder script was taken from an ad in the  Lodi Sentinel. The rest of the lettering actually came from a building of the same period in Kansas City. I liked the KC lettering particularly because of the use of the word "Kodak" as a generic term for camera. This was common in this era due to Eastman Kodak bringing easy photography to the masses for a low price.
      The structure itself is a SLM kit. It is a nice kit with good detail and is easy to assemble. I recommend them if you can fine one. The company is out of business and the kits are hard to find.

Wednesday, July 18, 2018

Windmills and a Little Whimsy

The prototype Davis windmill wheel and vane on display at the San Joaquin County Historical Society at Micke Grove Park.
The Improved Davis Windmill.
Stockton, at least in my time period, was known as "The City of Windmills." Windmills were needed since Stockton was on a flat plain. With no elevated spots nearby, there could be no gravity flow of water, and before vast municipal water companies, the only way to get water was to pump for it. Hence
the mills were erected in almost every backyard, all grinding and squeaking away providing background noise for the city's business. Stockton may also have been known as the Windmill City because there were at least two manufacturers located in town: R. F. Wilson and Relief Windmill.
     The R. F. Wilson company had its plant down by the Stockton Channel not too far from where the rails of the Stockton & Copperopolis ran. While the prototype railroad did not directly service the plant, my S&C does so I had to have some of the Davis style windmills the company made. Fortunately for me, there are numerous pictures showing the popularity of the Davis mill and there is an real windmill wheel and vane assembly in the San Joaquin County Historical Society which I could measure and copy.
The Improved Davis Windmill as rendered in Sketchup.
   
     Building a windmill wheel is kind of tricky. All of the parts are small and must be aligned perfectly for it to look right. I decided to try to 3D print mine. It was my first project and went ahead without too many mistakes and starting-overs. I had it printed, made some decals and had a genuine [model] Davis windmill. Now I've got to print a few more to scatter around the landscape.
   
While building some other boxcars (more about these in a later post), I came across a couple of old items. One of these was a decal set I had made several years back for a Central Valley Superior Detritus car. Back in the 1950s, when Central Valley was building older railroad car kits, George Hook, CV's owner, made a few special kits up for his friends. One of these was for the imaginary Superior Detritus company advertising such things as diacoustic infusoria, frangible ceramics and so on. I have always liked the car so I built a standard CV boxcar and lettered it for the SD Company.

The original cardboard sides and the Central Valley car with the new decals applied.
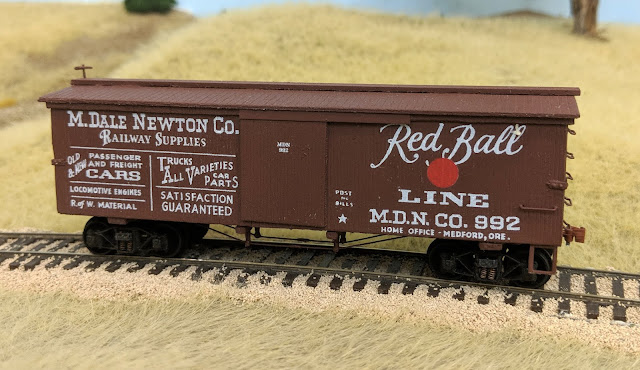
     The other item was a set of cardboard sides for a Red Ball boxcar. Before high quality decals, screen-printed cardboard sides were very popular and really didn't look too bad. The Red Ball sides advertised the products the Red Ball company made in the style of the nineteenth century. Most of the Red Ball parts (no sides, though) are still being offered through Bitter Creek Models. I did not want to use the printed sides so I scanned them and made up artwork for a decal side which I used.
     These two cars represent the whimsy alluded to in this post's title. There were never any prototype cars such as these run on America's railroads but I enjoyed building them and remembering when I first saw the SDC car at age 12 and the Red Ball car a bit later. After all, as Model Railroader used to say (and sometimes still does), Model Railroading is Fun.

Thursday, May 3, 2018

Factories at Stockton and Warehouse at Cometa

Henderson Carriages is located just behind the depot on the industry spur in Stockton.
Several years ago, I bought an old Magnuson kit called Menasha Woodenware. It had this great look of a three-story nineteenth century factory or warehouse. I had been looking for a place to put this building on the railroad and finally found it. It is in Stockton on the spur serving the Pacific Tannery, Simpson & Gray Lumber and the Globe Iron Works.
     Putting the kit together was fairly easy in spite of the fact that the instructions were missing. The sides were all cast resin and it was pretty intuitive. I had to decrease the depth of the building to fit the space I had but it still is an imposing structure.
     I decided to name it after the M. P. Henderson Carriage Factory. Henderson made wagons and carriages for use throughout the western U.S. Their Stockton factory was, indeed, a three-story building and looked somewhat like the Magnuson kit. Using a photo of the prototype, I made a few signs and now I have another switching destination for Stockton.
   
Cometa is looking better with two real industrial spots now. As soon as some more dirt is sifted, I can finished the scenicking.
 Recently, I was doing a bit of scenery around Farmington and decided that Cometa needed a couple of structures to establish it as a town on the railroad. The real Cometa had a grain warehouse and a corral and there was just enough space to model both of those. The Walthers Shed on Pilings kit is a nice small warehouse with sliding doors but it was too small for Cometa's needs so I bought two of them. Putting them together end-to-end gave a building about the right size but it was frame and looked like, well, two Walthers kits spliced together. Looking again at my map collection revealed that the prototype warehouse was sheathed in corrugated iron so I decided to do that. Using double-sized tape, I attached Campbell's corrugated iron to the building, painting it and then weathered it slightly with some Bragdon's rust powder.
     I wasn't sure what to call the warehouse, though. The information I had was a bit sketchy. I did some checking on the internet and found that an outfit called Haslacher & Kahn owned the Cometa concern plus several other grain warehouse in the area. Some more searching found an old letterhead for the company and gave me the style to be used on the sign. I printed it out and attached it to the building's side.
     The corral was built with pieces left over from a Walthers stock yard kit used elsewhere on the railroad. I added a small general store and some signs and now Cometa looks like a real destination point except for the lack of ground cover. I ran out of sifted dirt and so Cometa will look very barren until I sift some more.

Tuesday, April 17, 2018

The Rest of the City

Stand-in buildings show what a finished street might look like in downtown Stockton.
Making the building flats for Stockton (April 8 Post) started the city on its way to looking like a city. The unfortunate thing was that several of the streets ended at the backdrop and the result was not particularly realistic. I have seen other modelers use real photographs glued to the backdrop to make it look like the road continued but the only photographs I have of 1890s Stockton are in black-and-white. Since Stockton's nineteenth century buildings are mostly gone, I decided to try colorizing some of the monochromatic photos I have.
    Knowing nothing about colorization, I googled the process and found it to be rather straight-forward but a little tedious. Using Adobe Photoshop, I started adding colors and, a few hours later, had a reasonable-looking color street scene. After printing out a picture which appeared to be about the right size, I pasted it to the backdrop and the result is above.
     I needed at least one other photo but the bulk of my street scenes did not have the photographer standing in the middle of the street producing the right view for railroad modelers a century later. I did, however, have scenes of two separate streets which I thought could be combined, again using Photoshop. Once the two scenes were joined, I colorized the picture and the result is below.
   
This street scene was made by combining shots from two separate streets and joining them in Photoshop.
 I was pleased with these first attempts and am looking forward to completing the street, adding structures and a few vehicles. I think Stockton will start looking more like a big city.

Sunday, April 8, 2018

Industrial District Buildings Appear at Stockton

The entire set of flats I constructed stretches about six feet along the backdrop at Stockton. The depressed area at the right will be a marsh. The two gaps in the flats are for Centre Street (at left) and Commerce Street.
A few of my regular operators have told me that they would like to see some progress on structures at Stockton (it only had the two-stall roundhouse and an open-air warehouse for the steamer line). I decided to respond to their wishes and also get some kits out of their boxes. Using some of the Walthers building flats and a couple of parts from another kit, I came up with several distinct businesses, all of which existed in Stockton near the railroad.
 
The far right of the flats is the Pacific Tannery, one of the online shippers on the railroad. The two buildings to the left are Sylvester and Moye, furniture makers and Stockton Bags and Burlap.

The next buildings are Hammond, Moore and Yardley, grocery and provision sales and Thomas and Buell of the Stockton Planing Mill.
Wm. P. Miller sits between Centre and Commerce Streets. They were a big manufacturer of wagons and carriages. They weren't quite as well-known as Henderson but I liked the lettering on their building better.
To the left of Centre Street is the Stockton Glass Factory.
Having nineteenth century photos of the prototype buildings, I tried to use the same type fonts that were used then with the same slogans and signs. Unfortunately, the building flats themselves don't correspond to the actual buildings but are merely there to provide a sort of ambiance to the scene. I plan to work from the backdrop to the aisle as far the structures go
     Now I have to figure out what to do about the "continuation" of the streets into the backdrop. I have a couple of ideas which I hope to share once I perfect them.
   

Wednesday, August 26, 2015

Odds and Ends

The far siding is for the Stockton Agricultural plant while the middle one is for the future Standard Oil distribution center. A copper smelter will occupy the area adjacent to the ore cars. The cars themselves were built after similar cars used by the Virginia & Truckee Railroad for hauling ore.
When I am waiting for parts to arrive, I generally find some smaller projects to myself busy. That is what has happened over the past few weeks. Over in the Stockton area, there were three rail-served industries that had not had track laid to them, mainly because I hadn't decided just how the structures would be arranged.
   The first industry was the Stockton Agricultural and Manufacturing Company. The prototype made all sorts of things from plows to harvesters to steam traction engines. It was a large complex occupying several buildings. There was no way I could accommodate all of the buildings so I had to selectively compress what was there. Using an 1895 Sanborn insurance map, I decided which ones best represented the buildings and laid them out on the plywood sub-roadbed. This location pretty much defined where the Standard Oil Distribution facility would go. The only problem left was where to put the copper smelter.
    Stockton, in the 1890s, did not have a copper smelter. Any ore sent down from Copperopolis was shipped to smelters outside of California. The trouble (for me) was that I had a nice set of 4-wheel ore jimmies that I wanted to use. The only logical way to use them was to carry the ore to a smelter and the only logical place for that smelter was in Stockton. After evaluating every other option I could think of, I decided to install a diamond crossing in the siding tracks. Since the siding that would be crossed was on a curve, a special diamond needed to be built. I laid out the curve simply by taping a piece of paper over the track and making a rubbing of the rails on the paper. The location of the other track was marked in the same way. Using that as a guide, I soldered up the diamond on PC board ties. It was not as difficult as I had thought it might be. The resulting siding is just long enough to hold the string of empty ore cars as well as the full ones which will replace them.
   
The Canfield-McGlone kit is a good model of the prototype and is easy to assemble. Note the end doors.
Another of the small projects was assembling a kit of a car I had been wanting to build for several years. Photos of the Standard Wagon Co. car of the Cincinnati, Hamilton & Dayton Railroad have been around for years. Irv Schulz, Clover House, Art Griffin and even MDC had made cars or lettering sets for it. A couple of years ago, John Canfield and Bob McGlone developed a kit for the car which simplified my work immensely. 
   
The prototype car was built without air brakes and is pictured here around 1890.
The car is interesting in that it was built on an old flat car. The stake pockets are clearly visible along the bottom of the car. The car siding is horizontal which is consistent with it being attached to long vertical stakes. The Official Railway Equipment Registers specifically call out this car as being only for buggies (i.e. relatively light loads) and should not be loaded with heavy freight. The end doors make it interesting. They were typical for carriage and buggy cars. Maybe I will have to build some end platforms on my team tracks.
   Unfortunately, the car kits were a limited run and are no longer available. They should not be too hard to build, however, using the information from the ORER and the photo.

Tuesday, June 16, 2015

New Turntable at Stockton Wharf

The Stockton Wharf turntable serves two tracks plus the lead. A small figure at one end of the table acts as a reference market for alignment. The two bright metal T-nuts support the motor assembly. This entire area will eventually be scenicked as a marsh.
The turntable at Stockton Wharf is fairly far away from the view of the operator and, as such, the rails have been difficult to align. A step stool and a mirror have been the best tools so far and those are a bit crude. The best solution would have been an indexing system like that made by New York Railway Supply but I thought that was a bit pricey for just three tracks to the turntable. Finally, I have found a lower cost system which seems to solve the problem.
 
A stepper motor is supported by a piece of aluminum and two lengths of all-thread rod hung by the T-nuts in the photo above. A machined coupling connects the turntable shaft with the motor shaft. The long rod extending from the coupling is an index to zero the table's initial position with the sensor at the left of the support bar.
 Last year I found a video on the internet which showed a small system being developed by a Scottish electronics company. I followed up with the company who then produced a circuit board kit which can be programmed by the user. The product is limited in that only six positions can be programmed. This means that two positions are used just to turn an engine (one for each end of the table). It's only good for those end-of-the-line turning situations with few or no tracks. I only used four positions for the Stockton table to serve a lead and two roundhouse tracks. 
 
A simple controller handles the position. The button and knobs along the bottom
are for programming. 
A system was duly bought and assembled (it's a kit), the additional parts (motor, switches, etc.) purchased and the mechanical end designed and built. Once it is installed, it is easy to program and can be reprogrammed just as easily. The motor used is a stepper motor which means that the hardware retains the motor's position so it always returns to the same place. The nice part is that it works. My only criticism is that the table's lowest rotational speed is too fast for my taste. I've spoken to the company and they said they would lower the speed. I'm now awaiting a new board to see how that works.