Showing posts with label Structures. Show all posts

Friday, May 7, 2021

A Work in Progress

The California Grand Palace's streetside view and main entrance.

The Oakdale trackside area has had a blank spot in it for far too long. Part of the reason it stayed vacant is because I had not yet decided what might go well in that spot. Several weeks ago, I finally reached a decision had began building a suitable structure. I wanted a large saloon with a detailed interior including a stage for entertainers. This saloon would also include a sound track. As of this point, I have completed the exterior structure of the building but the sound and detailing the interior still needs to be accomplished.


The Long Bar is ready for customers but standup ones only. Tables and chairs are still to be added. The stage curtain is typical of early theaters which put the advertising space to good use. The "kerosene" lamps were made from plastic beads and very small leds. 

The saloon is totally freelanced and not based on any specific structure. To be honest, real saloons were generally  built with a narrow front entrance but a long depth, just enough for the bar and a few tables. The Grand Palace has more in common with the huge edifices often seen in Hollywood western movies. It's not particularly prototypical but it is what I was looking for.

    Construction is with acrylic sides with styrene siding laminated to them. The window and door casings were cut using my laser cutter. Other parts were styrene shapes plus detail parts from Tichy and San Juan Details.

     The interior of the building has a stage with a working curtain and a number of LED lights. There's much more to do but the drinking class of Oakdale seem to be looking forward to completion. 

Friday, January 8, 2021

Two New Additions

The "Gray house" in its temporary location at Farmington. It will eventually be moved to the residental area.

A few weeks ago, a favor was done for my friend, Doug Taylor. In return, he volunteered to build up an old Classic Miniatures kit I had not gotten to. The Gold Hill House, as the kit is named, is now sitting at Farmington awaiting its final location, adjacent scenicking, etc. Doug substituted styrene for the kit's cardboard siding otherwise it is pretty stock. As usual, Doug did a great job and now it's up to me to follow through. 
     
The disassembled Unimat on the workbench. I am still awaiting a part and drive belts so it can be put back together again.

On the workshop front, I bought a Unimat lathe through ebay with the thought that it might be better for some of the smaller parts that we tend to make in this hobby. The lathe had not been cleaned so it was disassembled, scrubbed and de-rusted. Now it's sitting on my workbench awaiting a part so I can reassemble it and get it working. The Unimat is a versatile machine but only for relatively lightweight projects. I have a 12-inch lather I can use for the bigger stuff. With the small machine, though, I can convert it to a drill press, mill or any number of other things if I find the right conversion kit. It's sort of a miniature Shopsmith. 
     There are slightly larger but more expensive lathes available from Sherline or Micromark but the Unimat has a special appeal for me as I had one in the 1970s. Back then, my interests tended more to the manufacture of antique car fittings so the Unimat was deemed surplus to needs and sold. I wish I hadn't done that but now I can try again.

Wednesday, December 30, 2020

A Look Back

 
The old Forbe's Crossing depot now doing service at Holden on a temporary basis. Maybe a little repair work on the roof would be in order.

     While rumaging around my railroad room the other day, I came across a depot I built back in the 1990s. It really wasn't lost as it was sitting at Holden as a place-holder for the real depot to be built sometime in the indefinite future. Originally, the depot served the community of Forbe's Crossing on my Moraga Springs Northern Railway when I lived in California. I built it from a Period Miniatures kit and then detailed the interior. On that MSN, the structure was right up front and it was easy for visitors to look at the interior. Now, it sits back about two feet away from the aisle waiting for a location.
   
Interior details are by SS Ltd. and others. I think it needs a couple of passengers, maybe an agent.

 
The depot in its old location of Forbe's Crossing on the Moraga Springs 
Northern.

I took the time today to take another look at it and snapped these photos. It looks pretty much as I remember it from about 25 years ago. It needs a better home than it has now. The town of Ione on the narrow-gauge Stockton & Ione RR needs a depot. I think that it where it should go. I need to get that part of the railroad operating anyway.


Monday, June 8, 2020

A Photographer for Stockton

The Batchelder building in downtown Stockton.
Benjamin Pierce Batchelder started his photography business in Stockton in 1853. Although he moved his business around the world, he finally settled in Stockton for good in 1872, His business address was less than a block from the main line of the Stockton & Copperopolis. Batchelder died in 1891 but his wife, Nancy, continued to operate the business until at least 1895.
 
The decals were copied from a Kansas City photographer of the 1890s. The building front was painted
to resemble different types of stone used in its construction.
 My model of the Batchelder enterprise is freelanced. The Batchelder script was taken from an ad in the  Lodi Sentinel. The rest of the lettering actually came from a building of the same period in Kansas City. I liked the KC lettering particularly because of the use of the word "Kodak" as a generic term for camera. This was common in this era due to Eastman Kodak bringing easy photography to the masses for a low price.
      The structure itself is a SLM kit. It is a nice kit with good detail and is easy to assemble. I recommend them if you can fine one. The company is out of business and the kits are hard to find.

Friday, April 10, 2020

Last Structure (I hope) for Farmington

This side of the building faces the main Farmington road. For some reason the prototype wall was angled about 20 degrees from the road. No picture of this side of the building could be found so I imagined how it might appear.
I really do enjoy building structures but doing them in the concentrated fashion that I have been the last few weeks makes me want to do something else. In any case, the last planned structure for Farmington is now completed, the Farmington Warehouse. The prototype of this building was built in 1874 as an assembly hall for the town but was quickly turned into a grain warehouse. The building survived into the 1990s or so. When I finally visited Farmington in the late '90s, it had already been razed with the only left being a foundation wall and some piers. I did have a couple of photos and dimensions from a couple of insurance maps so that would have to be enough.
   
The warehouse will eventually be raised onto a cork base to make it even with the track serving it. In the background are the rest of the buildings destined for this town.
The basic structure for the building is .040" styrene sheet reinforced with 1/8" x 1/4" styrene strips. N Scale Architect brick siding was then glued on these sides with caulk. I 3D printed the warehouse doors while the front doors were Tichy or Grandt Line doors. I figured that, since the building was supposed to be a hall, they would have a bit nicer front doors. After I had gotten everything assembled, I found a distant photo showing more windows in one side. I wish I had seen them early but I was not going to add them at this point.
   
The trackside had two loading doors with small platforms. It does look better than the cardboard box which was here.
 The roofing paper was made by Minuteman Models. I enjoyed making this structure and it will sure look better on the railroad than the cardboard box I was using as a stand-in. The next step is to start scenicking the area to look like there is actually a town here.

Thursday, April 2, 2020

Small Structure From a Photo


The Woods Cigar and Newspaper agency taken around the turn of the 20th century.
A couple of weeks ago, while browsing through Facebook, I ran across the above photo of a small Cigar and News shop. These small businesses once thrived through the cities and towns of America and the somewhat fancy signage intrigued me enough that I wanted to model it. Although the photos seems to indicate that the shop was part of a larger building, I modeled it as a stand-along frame structure.
   
My model of the store. The interior photo is not very visible in this view but it suggests that the building is more than just an empty shell.
 My model was built from Evergreen styrene sheets and strips. Estimating from the photo gave me a structure of about 15 feet wide. I modeled it to be about 25 feet long. the interesting parts of the model included the deep-set window with the "Magazine and Papers" sign and the "Laundry" sign protruding from the face of the building. Of course, the main sign seemed, perhaps, a bit fancy for a small business but also added to its appeal for me.
     Construction was straight-forward using Tichy doors and corbels. The molding below the window was half-round stock. Decals were made using Adobe Illustrator and printed on an Alps printer. Since it is such a large window, I located a photo of a typical newstand and sized it to fit inside the building to give it an appropriate interior. While this small building cannot hold both magazines and the steamy atmosphere of washing clothes, many Chinese laundries were outside establishments and will eventually show up behind the shop. This little project was a nice respite from building larger warehouse and other structures for Farmington. Next, I will be constructing another grain warehouse, this one made from brick.

Wednesday, March 25, 2020

Long and Owen Agricultural

Ready to install on the railroad, Long and Owen will be a nice replacement for what has been just a label for the industry.
One of the industries in Farmington is Long and Owen. They sell farm implements as well as seed, feed and fertilizer, all of which, of course, is delivered by rail. Initially, I was thinking of scratchbuilding this industry but then found a commercial kit which looked pretty much like what I was thinking of. It was the Laser Art Structures George Nickel's Supply company. It turned out to be a fairly easy construction with laser-cut peel-and-stick parts. It went together quickly and was painted, lettered and ready for the railroad in about two days.If the rest of their line is like this one, I highly recommend these as good-luck easy-to-assemble structures which would look good on anyone's railroad.
     It looks like I have two more structures to build for Farmington before I can permanently lay out the city and start scenicking the area. Both are grain warehouses, one frame and the other, brick. Starting the frame building will be today's project.

Saturday, March 21, 2020

Another Saloon

A small local saloon with no entertainment other than a mediocre piano player. The multi-colored cable at the distant left of the photo is  what connects the building with the electronics for the sound and lighting.
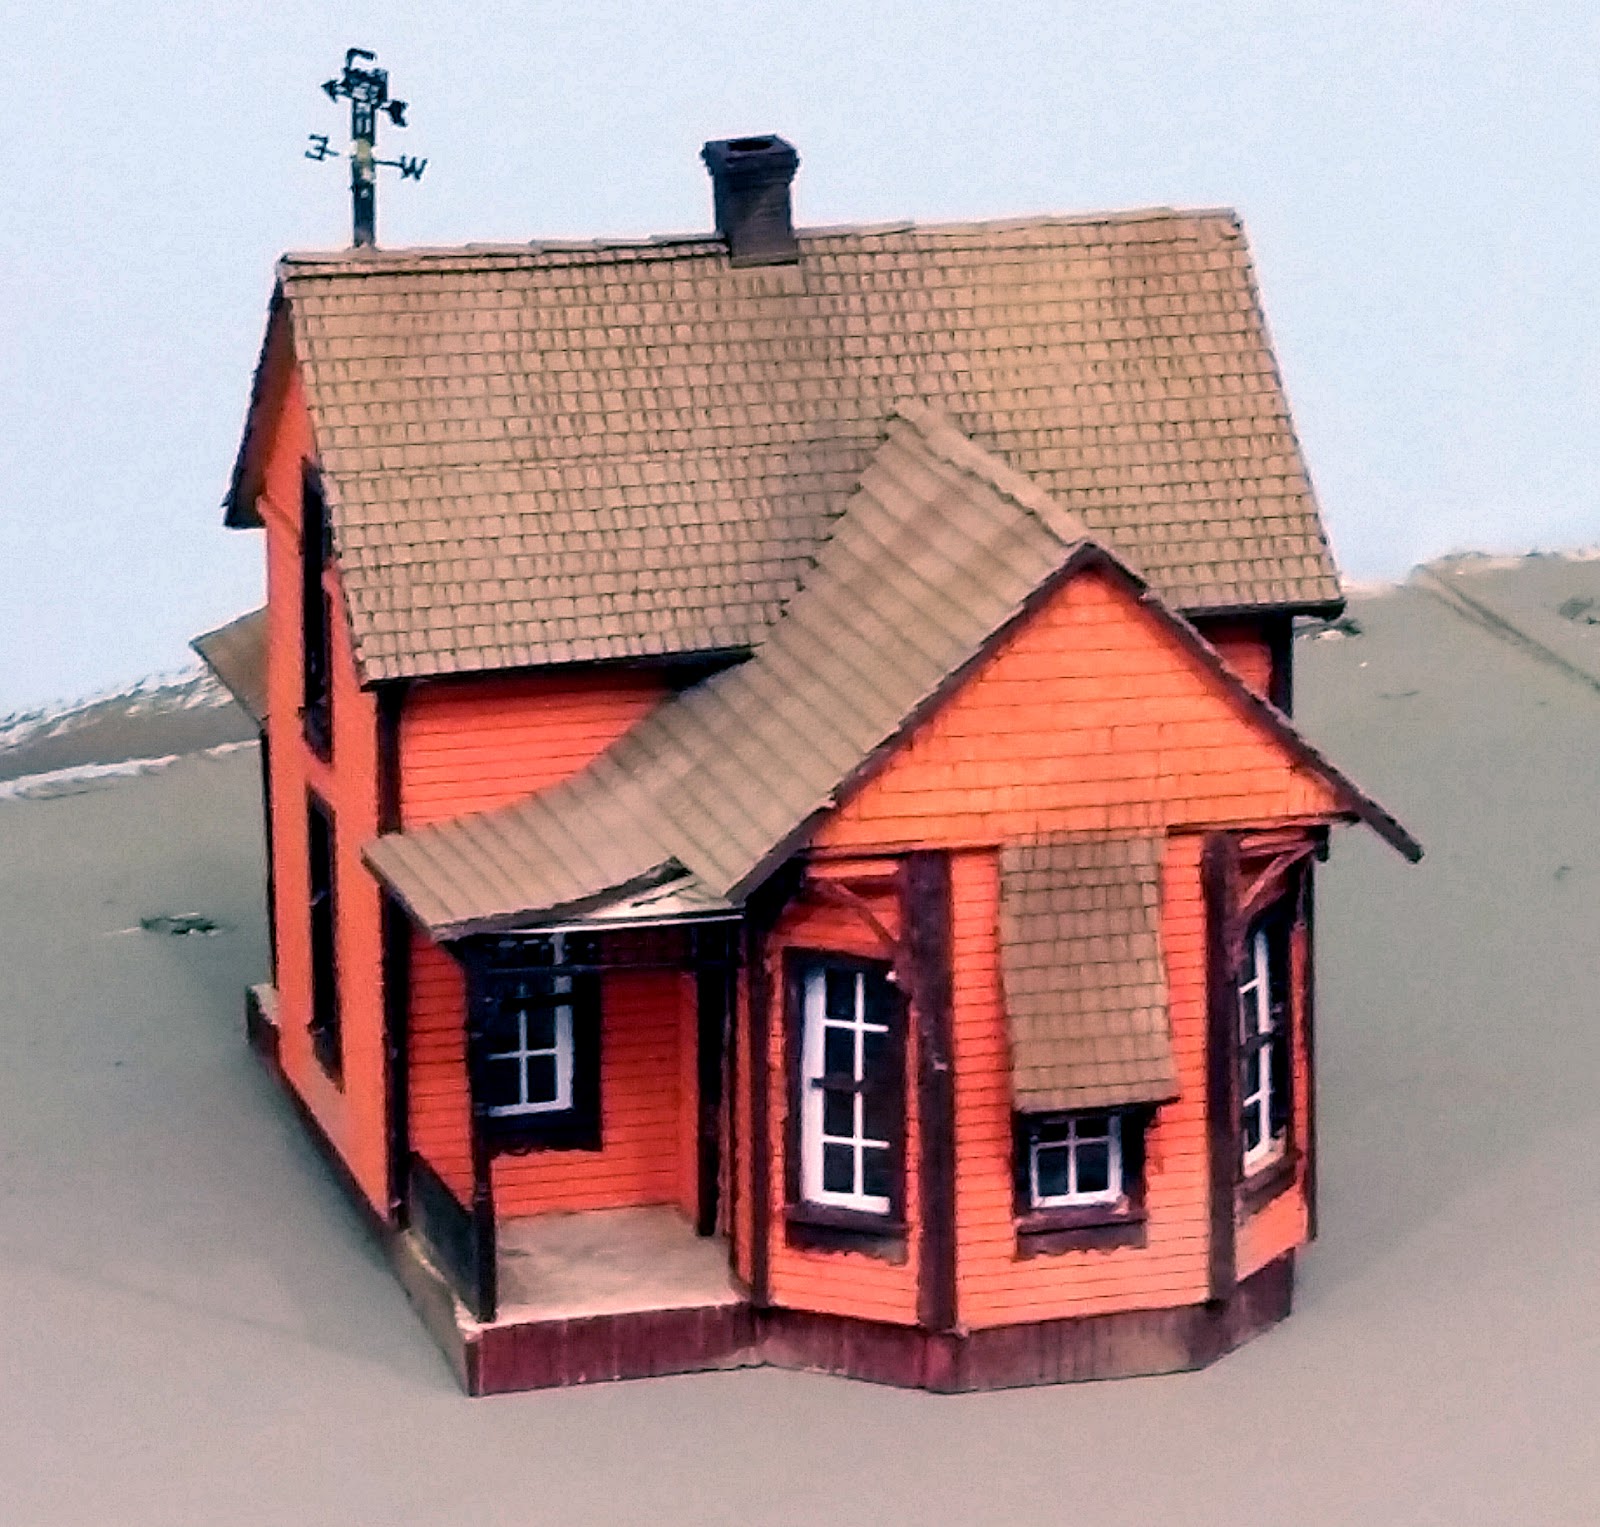
Some Farmington citizens are a little concerned that a second saloon has worked its way into the life of the town. The place is small, though, with only three tables and the bar. There's only a piano player for entertainment with the room upstairs is occupied by only the owner. It looks like it might be a quiet place for a fellow to have a beer and visit with friends.
     With the Coronavirus isolation, there was plenty of time to work on models. Over the past couple of weeks, I have been assembling an old Master Creations saloon kit. This pile of laser-cut parts was from the early '90s when you had to assemble windows from a bunch of tiny objects you hoped you could find on the parts sheet. It was tedious work but interior details were provided and a sound system with "realistic" saloon sounds plus lighting. I finally finished the thing today and am very ready for something else to work on.
   
The long bar at the Corner Saloon. Note the beer mugs
on the bar and behind the bartender.
Working on the interior was the most fun for me. The wide front windows should allow most of it to be seen when the lights are on. I meant to take photos of it before I glued the building down but, in my haste, forgot it. I did manage to get a few shots through the windows, though, which are featured here.
     Some bottle-shape castings were provided in the kit which were duly painted and installed on the bar but, in my opinion, the nicest pieces were the beer mugs made by Busch. These scale mugs come in both clear (for empty mugs) and amber (for full ones). A touch of white on the top of the amber mugs put a realistic "head" on the brew. A bunch of these were scattered around on the tables and bar.
     1.5 volt light bulbs are installed in the bar, under the eaves, over the signs and in the upstairs room. These are controlled by the electronics. I have yet to see them work but they are supposed to come on in some sequence. It will be interesting to get it all operating.
     A large speaker is mounted in the building to provide the sound effects which seem to be rather dated and cut as opposed to what might actually have been heard in a bar. I think a better scheme could be developed with the more modern devices now available. I will try that in a future project.
Another shot looking through the front door at the piano on the right and bar
on the left. Note the mug on the piano for tips.

     The circuit boards are quite large and will be mounted under the layout. Wires for the speaker and lights will come to the model through a hole beneath it.
     The Corner Saloon was named after the Corner Bar in Virginia City, Nevada at the corner (appropriate enough) of B and Union Streets. The original has been in the same spot since 1875 when Piper's Opera House, in which building it resides, was built. Although there were several years of vacancy in the 20th century, it is back in business. Drop by both Piper's and the Corner Bar the next time you're in Virginia City.


The oversized electronics are on the left with one board sequencing the lights while the other provides the timing and substance for the sound.

Saturday, March 7, 2020

Even More Structures

Three new businesses have arisen in the last several days, and yes, I have been graciously given a portion of my wife's quilting room for a workspace.
Farmington keeps growing. Three more businesses have been constructed in the last couple of weeks and the main street is filling up.
     There are not a lot of photos showing the various businesses in Farmington. Most of them are livery stables it seems. The three just completed are all kits I had on hand but seemed to suit the area and are typical of the occupancies you would find in a small town.
     The one of the left is known as Becky's Café. Next door to it is a small office/store area which is currently "For Rent." This structure is a Main Street Heritage kit based after a store in Silver Plume, Colorado. The paint scheme is based on the colors in use on the prototype. The real estate and surveyor's shop was built from an old Dyna Models kit from the 1950s-60s. The false front of the kit was very plain and didn't look right to me so I added a small cornice with some Tichy corbels. The last building is also a Main Street Heritage building which looked right for a small professional office, in this case an attorney's firm.
     The boardwalks in front of the buildings may look like a typical kit, not extending any further than the building itself. According to the photos, though, this is the way many places were. The builder took care of what he thought was important and left the rest of the street to his neighbors. If the town had the money, it would complete the walk throughout but this was not universal. I may add some more walkway when I get to my final installation depending on the locations of each structure.

Thursday, February 27, 2020

More Structures

Both new structures will find a place on a street in Farmington.
Two more merchants have decided to move into the growing town of Farmington. L. Miller, a dealer in dry goods and notions, has moved into a gold rush era stone building while the McCormick brothers have established their butcher shop next door in a brick structure.
     Both structures were constructed with Main Street Heritage kits. The Miller building is a combination of two Weekly Record kits, one stacked upon the other. The balcony railing is a Grandt Line product. Typical of gold rush buildings, I added iron shutters on the front doors. They are Model Die Casting parts made long ago for some of their structure kits. Over the years I have amassed several sets of these and am glad to have a place to use them. Their initial purpose was for fire protection but most were retained for security reasons. Today, if you visit California's Mother Lode country, you can still see many of the old buildings with their iron shutter.
     The brick building was from another Main Street Heritage product called Billy's Place. While intended for a small bar, I thought it the right size for a butcher shop.
   
"What this country needs is a good five-cent cigar" so spake Thomas Marshall, Vice-President under Woodrow Wilson. The sign is roughly full-sized.
The Coca Cola decal was made from a sign found on the side of a building in southern Missouri while Owl cigar sign was found on a building in Jacksonville, Oregon. The Coke sign was printed on my Alps printer while the Owl sign was printed on an inkjet printer on Testors inkjet white-backed decal paper. The Testors system is nice. The decal film has to be sprayed with a protective layer which protects the decal when it is immersed in water. In spite of the spray, the film is thin and is easy to work with. I recommend it.
     Main Street Heritage made several small resin-cast structures which are nicely done and easy to assemble. I recommend them highly. It is a bit of a shame, though, in that they appear to have gone out of business. I checked their website earlier this month and it has disappeared. If anyone knows if they are out permanently, please let me know. In any case, you can still find kits on ebay or in stock at some hobby shops.

Friday, February 14, 2020

General Store and Lodge Hotel Arrives at Farmington

The Dyke & Harrold store and the Central Hotel in their approximate final positions at Farmington.
Another view of the D&H store. The curved steps at the corner were a partic-
ular challenge.
As mentioned in my last post, I am now concentrating my efforts on Farmington. Besides the Central Hotel mentioned in my last post (http://sandcrr.blogspot.com/2020/02/farmington-gets-new-hotel.html), the Dyke & Harrold General Merchandise store has arrived. Soon after construction was finished, the Independent Order of Odd Fellows leased the second story for their lodge hall. Soon after, the Post Office department appointed O. D. Dyke Postmaster and what better place to put the business than in his store. All institutions are now open for business.
   
The prototype store with some slight additions due to moderni-
zation.
The D&H store was scratchbuilt from photos and measurements taken at the still-standing store. The prototype was built around 1873 and the Odd Fellows have met there ever since. Styrene scribed siding with Tichy windows and doors were used.
     The construction was straight-forward with the only problem area being the rounded steps at the corner of the building. They do add a nice look to the building, though, and were worth the trouble.
     The Central Hotel and associated Central Saloon were built, as mentioned, by my friend, Doug Taylor. I added the signs taken from a couple of closeup photos of the hotel entrance. In one of the photos, there is a light post outside the building with the hotel's name on it so that had to be added, too. The small space next to the hotel is still vacant but will soon be leased out to some going concern.
   
A closeup of the D&H front entrance. What is the somewhat
blurry red item at the end of the porch??

The Central Hotel and Central Saloon. The small red saloon signs were copied from a prototype photo of the building. The oval sign on the front porch column shows that the establishment serves California-made Boca Beer. The building to the left is for lease. Apply at hotel.

The real Central Saloon with its signs was obviously popular
for cyclists.
The light outside the hotel. See the prototype photo below.

Monday, February 3, 2020

Farmington Gets a New Hotel

The new Central Hotel as it sits on the workbench (yes, mine is as cluttered as anybody else's). Signs and other details still need to be added.
My next major project is to build out the town of Farmington. There are a couple of signature structures I will need to scratchbuild but a lot of the town will be populated by commercial kits. One of these signature structures is the Central Hotel. It was located across the street from the S&C depot and is very near the tracks. Unfortunately for me, there are no good photos of the hotel. I did have a kit made by JL Models which was the right size, though, and thought this would fit. A couple of weeks ago, I made some custom decals for a friend of mine and great modeler, Doug Taylor. He offered to build a structure for me so I suggested this kit. I am more than happy with the result, especially with the lack of good prototype information.
     Doug also built one of the livery stables which now resides at Milton. Thanks, Doug!
Downtown Farmington in 1914 complete with McKeen car. The Central Hotel is somewhere beneath the trees near the center of the photo. I do have the Sanborn maps for the area so I know the size which is why I chose the JL kit to represent the building.

Friday, June 8, 2018

The Depot at Farmington

Although the steps seem to be floating in air, when scenicking is done, they will be flush with the top of the ties. An earth berm will run from the train order signal past the privy .
The Farmington Depot is now complete except for scenicking. It was an interesting project using customary model building techniques combined with laser cutting and 3D printing.
The 3D printed casings fit perfectly around the Tichy
window castings.
The depot has some unusual casing details around the upper part of the window. I drew up some 3D drawings of it sized to fit the Tichy windows and doors I was using and sent them to Shapeways to have the casings printed.
     In the prototype photo shown in my last blog (http://sandcrr.blogspot.com/2018/05/laser-cutting-and-depots.html), you can just barely see the end of a ladder peeking out from behind the depot. This was normally used to access the roof and it seems that most of the Southern Pacific depots had one. I relocated mine to the end of the building so someone might actually see it. The small "bridge" on the platform's end was used to span the gap between the platform and a car to aid in loading or unloading of it.
     Adjacent to the depot is something one sees at almost all of the depot photos, the privy. This one is a standard SP design and is made from two of the Tichy outhouse kits. The lattice work around the privy is also from Tichy.
The privy at Farmington and the model privy. It is a close copy. I realize that the model roof has a steeper pitch and the lattice work is square rather than on an angle. These were modeling considerations I took into account to get the "feel" of the structure rather than make an exact copy. In other words, I was a trifle lazy.

Tuesday, May 22, 2018

Laser Cutting and Depots

Farmington depot circa the 1890s. Note the privy behind the lattice fence at the right and the switch stand.
A few months ago, I bit the bullet and bought a laser cutting machine. It sat in my basement for 2-3 months simply because it was too cold in my shop to work comfortably. I finally started working with it a couple of weeks ago and just cut my first real project, the Farmington depot. The prototype was a board-and-batten structure and was relatively small as depots go. Being smaller in scale made it a good first project.
   
Farmington depot. The window and door openings were sized to accept Grandt Line windows and doors. In the foreground is .010" thick styrene with the gable trim cut out by the laser.
Depot with scallop trim.
Evergreen styrene was used for the basic siding. I always thought that styrene was really not suitable for laser cutting but that is not true. I managed to cut the siding very smoothly, especially the cutouts for the windows and doors. The ends of the depot had some interesting scallop trim that was perfect for the laser. I made a CAD drawing of the trim and the laser made a good job of it.
     The baggage doors were not the right size for either the Tichy or Grandt Line doors so I did another drawing. The doors using were cut from 3/32" acrylic and the trim from a manila file folder.
   
Acrylic baggage doors with trim pieces awaiting paint.
The building is not yet finished but is on its way and the laser has justified its expense (at least in my mind). One of the selling points on getting the machine was being able to cut special templates for my wife's quilting projects. Naturally, the very first project done was some holders on which to wind quilt binding.

Thursday, May 3, 2018

Factories at Stockton and Warehouse at Cometa

Henderson Carriages is located just behind the depot on the industry spur in Stockton.
Several years ago, I bought an old Magnuson kit called Menasha Woodenware. It had this great look of a three-story nineteenth century factory or warehouse. I had been looking for a place to put this building on the railroad and finally found it. It is in Stockton on the spur serving the Pacific Tannery, Simpson & Gray Lumber and the Globe Iron Works.
     Putting the kit together was fairly easy in spite of the fact that the instructions were missing. The sides were all cast resin and it was pretty intuitive. I had to decrease the depth of the building to fit the space I had but it still is an imposing structure.
     I decided to name it after the M. P. Henderson Carriage Factory. Henderson made wagons and carriages for use throughout the western U.S. Their Stockton factory was, indeed, a three-story building and looked somewhat like the Magnuson kit. Using a photo of the prototype, I made a few signs and now I have another switching destination for Stockton.
   
Cometa is looking better with two real industrial spots now. As soon as some more dirt is sifted, I can finished the scenicking.
 Recently, I was doing a bit of scenery around Farmington and decided that Cometa needed a couple of structures to establish it as a town on the railroad. The real Cometa had a grain warehouse and a corral and there was just enough space to model both of those. The Walthers Shed on Pilings kit is a nice small warehouse with sliding doors but it was too small for Cometa's needs so I bought two of them. Putting them together end-to-end gave a building about the right size but it was frame and looked like, well, two Walthers kits spliced together. Looking again at my map collection revealed that the prototype warehouse was sheathed in corrugated iron so I decided to do that. Using double-sized tape, I attached Campbell's corrugated iron to the building, painting it and then weathered it slightly with some Bragdon's rust powder.
     I wasn't sure what to call the warehouse, though. The information I had was a bit sketchy. I did some checking on the internet and found that an outfit called Haslacher & Kahn owned the Cometa concern plus several other grain warehouse in the area. Some more searching found an old letterhead for the company and gave me the style to be used on the sign. I printed it out and attached it to the building's side.
     The corral was built with pieces left over from a Walthers stock yard kit used elsewhere on the railroad. I added a small general store and some signs and now Cometa looks like a real destination point except for the lack of ground cover. I ran out of sifted dirt and so Cometa will look very barren until I sift some more.

Tuesday, April 17, 2018

The Rest of the City

Stand-in buildings show what a finished street might look like in downtown Stockton.
Making the building flats for Stockton (April 8 Post) started the city on its way to looking like a city. The unfortunate thing was that several of the streets ended at the backdrop and the result was not particularly realistic. I have seen other modelers use real photographs glued to the backdrop to make it look like the road continued but the only photographs I have of 1890s Stockton are in black-and-white. Since Stockton's nineteenth century buildings are mostly gone, I decided to try colorizing some of the monochromatic photos I have.
    Knowing nothing about colorization, I googled the process and found it to be rather straight-forward but a little tedious. Using Adobe Photoshop, I started adding colors and, a few hours later, had a reasonable-looking color street scene. After printing out a picture which appeared to be about the right size, I pasted it to the backdrop and the result is above.
     I needed at least one other photo but the bulk of my street scenes did not have the photographer standing in the middle of the street producing the right view for railroad modelers a century later. I did, however, have scenes of two separate streets which I thought could be combined, again using Photoshop. Once the two scenes were joined, I colorized the picture and the result is below.
   
This street scene was made by combining shots from two separate streets and joining them in Photoshop.
 I was pleased with these first attempts and am looking forward to completing the street, adding structures and a few vehicles. I think Stockton will start looking more like a big city.

Sunday, April 8, 2018

Industrial District Buildings Appear at Stockton

The entire set of flats I constructed stretches about six feet along the backdrop at Stockton. The depressed area at the right will be a marsh. The two gaps in the flats are for Centre Street (at left) and Commerce Street.
A few of my regular operators have told me that they would like to see some progress on structures at Stockton (it only had the two-stall roundhouse and an open-air warehouse for the steamer line). I decided to respond to their wishes and also get some kits out of their boxes. Using some of the Walthers building flats and a couple of parts from another kit, I came up with several distinct businesses, all of which existed in Stockton near the railroad.
 
The far right of the flats is the Pacific Tannery, one of the online shippers on the railroad. The two buildings to the left are Sylvester and Moye, furniture makers and Stockton Bags and Burlap.

The next buildings are Hammond, Moore and Yardley, grocery and provision sales and Thomas and Buell of the Stockton Planing Mill.
Wm. P. Miller sits between Centre and Commerce Streets. They were a big manufacturer of wagons and carriages. They weren't quite as well-known as Henderson but I liked the lettering on their building better.
To the left of Centre Street is the Stockton Glass Factory.
Having nineteenth century photos of the prototype buildings, I tried to use the same type fonts that were used then with the same slogans and signs. Unfortunately, the building flats themselves don't correspond to the actual buildings but are merely there to provide a sort of ambiance to the scene. I plan to work from the backdrop to the aisle as far the structures go
     Now I have to figure out what to do about the "continuation" of the streets into the backdrop. I have a couple of ideas which I hope to share once I perfect them.
   

Wednesday, March 21, 2018

New Packing House Arrives in Holden

A California Fruit Express refrigerator car awaits loading at the new San Joaquin Fruit Growers' Association packing plant.
The San Joaquin Fruit Growers' Association packing house in Holden is now complete and occupied in Holden. Refrigerator cars ship daily with apples, grapefruit and other produce. In other words, I have completed another structure for this town.
    It started life as a Walthers packing house kit. Usually, I don't use standard kits, not because they are not good, but because they seldom look like structures in the part of the country I am modeling. In this case, the Walthers kit looked like a frame packing house would like in the 1890s. The kit was assembled per the instructions with little being done. The signs for the building were custom printed.
     The stacks of fruit crates were constructed by wrapping wooden blocks with a printed wrapper showing stacks of fruit crates. This was done by first selecting end labels which appealed to me (there are numerous photos of these labels on line) and then reducing the image to HO scale. The label was then duplicated in a stack-like formation. The same thing was done for the sides of the crates and the top. These images were organized to form a wrapper which glued to the wood block. The individual crates were obtained from Shapeways (https://www.shapeways.com/product/X7NBJNAAQ/orange-shipping-crate-set-ho-no-lids?optionId=59187209&li=user-wishlist). They come in both open top and closed top configurations.

Monday, March 5, 2018

New Structures at Farmington

Two weeks ago, Kansas City hosted its bi-annual Prairie Rail event. This is an invitational operating weekend where railroaders congregate from all over the country to operate four railroads during the three days. This year, we had over 150 attendees operating on over 30 model railroads. The Stockton & Copperopolis was privileged to host two sessions with ten operators each. Fortunately, the railroad behaved and everybody seemed to be having a good time. Only minor problems  came up and were easily solved. I heard nothing but good comments about the event in general.
   
The Farmington Winery sits at the end of a spur at the edge of Little John Creek. The boiler house is in the rear. I still need to add some wine barrels and a vat or two around the outside. I will do that when I do the final mounting and scenery work.
 In the leadup to the event, everything was cleaned and checked but no new work was done for fear that some new problem would arise. In this period of limbo, I literally dusted off a kit I had been saving for over 20 years and decided to assemble it. The Farmington Winery was born! The basic kit was a Railway Design Associates mill which looked very much like some of the old California wineries. Not much in the way of modifications was done as it looked good the way it was.
   
The California Models cottage. The weather vane was added from an etched kit I had been saving. The house will sit on the other side of the tracks from the depot near the main town district.
 During the same time period, I finished another kit started several months back. It was an early kit with a lot of wood and paper details (no nifty Grandt Line castings here). It is going to be in the background so any lack of detail would not be noticed anyway. It turned out all right but the modern laser kits are more the way to go.