 |
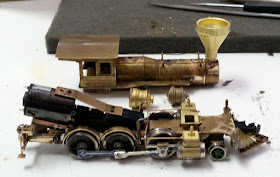
| The stripped down Porter Mogul with new cylinders, motor/gearbox and drivers. |
Now that the Christmas season is behind us, I can finally get back to some serious modeling. Santa was good to me this year giving me some needed tools for the shop and some interesting reading material.
Before Christmas, I had decided to start building the town of Milton but had to wait until some of the windows and styrene were ordered. While I was waiting, I started some research on early Virginia & Truckee RR locomotives. Without going into great detail (you can get detail at
www.virginiaandtruckee.com), the first three engines came from Union Iron Works, a small foundry and machine shop in San Francisco. I also discovered that engine 3 had been featured in a centerfold in an 1871 issue of
Engineering magazine published in London. A trip to the nearby Linda Hall library led to finding that issue and getting a copy of the article which included a full-scale drawing with dimension. With that in hand and three photos of the engine, I decided to try to convert an engine to Number 3, the
Storey.
 |
Ken Kidder's Porter Mogul was roughly the same dimensions
as the Storey but several features had to be redone or replaced. |
A few dimension checks showed me that the Ken Kidder Porter Mogul was very close to the right size for the
Storey. I had one the moguls on my shelf so I checked what would have to be done to convert it. The boiler was the right size but the domes were not. A couple of Precision Scale domes solved that problem. A Cal-Scale 1860s smokestack and bell solved those problems. The cab looked pretty good but had a curved roof rather than one with a ridge. I decided to live with feature rather than rebuild the entire cab.
The frame was a bit more work. The drivers were the wrong size (40") and had the wrong spacing. I had the correct size drivers (48") and could easily move the driver slot so it would be closer to the prototype spacing. Replacing the old open-frame motor with a Northwest Short Line gearbox and Sagami motor was next. The Ken Kidder cylinder set was also replaced with a spare MEW set I had along with the crossheads and main rod. Some careful machine work produced a pair of new siderods. While I was at it, I fabricated new fenders for the rear drivers and added a crosshead water pump. I have a spare PFM
Reno tender that I will use.
 |
| The prototype Storey as seen on the V&T. |
There's still a lot of work to be done to finish the locomotive but it seems to be going along well. When done, it won't be able to pull a great deal but neither could the prototype. There will be more to come later as construction continues.


Good site.
ReplyDeleteThat is really sharp!!! Wow!
ReplyDeleteWow, Don, that is some serious productivity! All since Christmas? Amazing.
ReplyDeleteThat rear driver placement looks to be right underneath the firebox, which is not very common. How did you move the driver slot, and come up with a shorter connecting rod? It seems to me that this would be difficult on a built-up engine.
Very nice work.
The driver slot was moved by simply soldering in a piece of 3mm rod in the old slot and then cutting a new one a bit forward of it. The drive rods were made new since I did not think that shortening them would be a good solution. As unusual as the driver spacing seems, the V&T had about 20 engines which all looked the same. Most were Baldwins but the short spacing was good for the sharp curves of the railroad.
DeleteThis comment has been removed by the author.
ReplyDelete